How to Use Parent App as an Early Childhood Educator, Manager, or Owner
As an early childhood educator, manager, or owner, managing a childcare center can be a daunting task. From keeping track of daily activities to communicating with parents, it can be overwhelming to handle everything manually. However, Parent™ Childcare App makes managing a childcare center easier and more efficient. In this article, we will discuss how to use the Parent™ app as an early childhood educator, manager, or owner. If you want to use Parent™️ child care app as a parent, We have that subject covered.
This program was developed specifically for Canadian childcare institutions and adheres to all Canadian early childhood education and development guidelines.
Overview of Parent™ Childcare App
Parent™ Childcare App is a cloud-based childcare management software designed to make managing a childcare center easier and more efficient. It offers a range of features such as attendance tracking, daily sheets, parent communication, and billing and invoicing. With Parent™ Childcare App, you can easily manage your center from anywhere, at any time, using your smartphone, tablet, or computer.
Benefits of Using Parent™ Childcare App
Using Parent™ Childcare App offers several benefits, including:
- Increased Efficiency: Parent™ Childcare App automates many time-consuming tasks, allowing you to focus on providing quality care to children.
- Better Communication: The parent communication feature helps you build strong relationships with parents and keep them informed about their child's progress.
- Improved Record-Keeping: With attendance tracking and daily sheets, you can keep accurate records of children's activities and progress.
- Enhanced Financial Management: The billing and invoicing feature helps you manage your center's finances more efficiently, saving you time and money.
Some of the key feathers in Parent™️ app that will take your childcare center to the next level:
Attendance Tracking
Parent™ Childcare App offers an attendance tracking feature that allows you to keep track of the attendance of children in your center. You can mark attendance for each child and generate attendance reports for a specific date range. This feature helps you keep accurate attendance records and ensure compliance with government regulations.
Daily Sheets
With Parent™ Childcare App, you can create and share daily sheets with parents. Daily sheets are a great way to keep parents informed about their child's daily activities, including meals, nap times, diaper changes, and activities. You can customize daily sheets to match your center's curriculum and activities.
Parent Communication
Parent™ Childcare App provides a secure messaging platform that allows you to communicate with parents in real-time. You can send messages, photos, and videos to parents, and parents can respond back. This feature helps you build strong relationships with parents and keep them informed about their child's progress.
Billing and Invoicing
Parent™ Childcare App also offers a billing and invoicing feature that allows you to easily create and send invoices to parents. You can set up billing schedules, track payments, and generate financial reports. This feature helps you manage your center's finances more efficiently.
Here’s how to use Parent App in your child care center
Table of content
1. Getting Started
1.1 Setting up Your Institute (Video Tour)
Manage Institute Details
To learn how to manage your institution details, check out the following video.
Manage Rooms
Learn how to add, edit, and delete rooms in your institute.
Manage Meals
Watch this video to see how to add, edit, and delete meals.
Manage Roles
Watch this video to learn how to create roles and give staff members different permissions.
Manage Closing Days
The following video shows you how to add closing days.
Opening Hours
Watch this next video to see how to change your institute's opening hours.
1.2 Recommended Devices
Use Parent with our recommendations for devices, and minimum requirements to run the application
Parent Child Care Management app is available on Android, IOS, and the Web, and can be downloaded on tablets or mobile phones for both staff and parents to use.
iOS Devices
To run the Parent application you must have a device that meets the following minimum requirement
Note: To run the Parent Check-in application you must have an iPad with the same minimum requirements.
**You can download the recommended devices for Parent App here
Android Devices
To run the Parent application, you must have a device that meets the following minimum requirements:
-
Android version 7.0 or higher
-
-
**You can download the recommended devices for Parent App here
HUAWEI Devices
To run the Parent application, you must have a device that meets the following minimum requirements:
-
Android version 7.0 or higher
-
-
Browser Recommendation
We recommend using the latest version of Chrome to use Parent's web portal. Parent does not support Edge.
You can access the Parent Portal here.
1.3 Bulk Import Children and Staff Data
Learn how we can easily import all your children and staff data.
If you have a large center the fastest way to add your children and staff is by using our bulk import. Simply fill out the spreadsheets with the required information and send them to us at contact@parent.cloud
Note: This service is only available to our premium customers and can take 1-2 business days to process.
Children Data
First, download the children's data spreadsheet and fill out the required information. Click on the button below to download the children's bulk import sheet.
Note: please make sure to keep the headers and do not change any of the formats.
Here is the information you can add:
-
Child’s full name*: This is the child's first and last name combined. This will be the name displayed for the child in the system.
-
Child’s class name*: This is the classroom the child is assigned to.
-
Child’s date of birth*: This is the child's date of birth. The date of birth needs to be in the following format: DD/MM/YYYY.
-
Child’s parent 1 Name: The name of one of the child's parents. Add this information to have a contact for the child.
-
Child’s Parent1 email: This is the parent's email so they can later be invited to the system and get updates about their child.
-
Child’s parent2 Name: The name of any second contact for the child. Add this information to have a contact for the child.
-
Child’s Parent2 email: This is the contact's email so they can later be invited to the system and get updates about their child.
*These are required fields and the bulk import will fail if they are missing.
Note: if you don't provide emails for the child's contacts you will have to manually add each of them individually to the system.
Staff Data
Download the staff data spreadsheet and fill out the required information. Click on the button below to download the staff bulk import sheet.
Here is the data required to import your staff list:
-
Staff’s full name: The name of your staff member that will be displayed in the system and any of their posts.
-
Staff’s group or class name: The name of the room that the staff member belongs to and is responsible for.
-
Staff’s email: The email address they will use to access the system.
-
Staff's Role: This is the role that contains the set of permissions you want to assign to the staff member. If this field is filled in, access will automatically be sent to the staff member during the bulk import.
1.4 Getting Started with Parent
All the steps to getting started with Parent.
Thank you for choosing Parent! We are very excited to have you on board. You have taken your first step towards a more efficient nursery management system. The team at Parent strives to create the ultimate all-in-one application that is easy to use. We have put together a guide on how to get started.
Download the Application
Add Rooms
Rooms are at the core of Parent, so this is one of the first steps you have to take.
Note: if we upload your roster, the rooms will automatically be added.
Add Children
Add Staff Members
Learn how to add staff members to the system and assign them different roles based on the permissions you want to grant them.
Invite Parents
You added students and your teachers have had the time to explore the application, now it's time to invite the parents. We recommend sending an introduction email to the parents along with this brochure to get them excited about Parent and the feature they will have access to.
To bulk invite parents, contact us 2-3 business days before your launch date, and we will schedule the activations to be sent out.
You can also invite parents by navigating to the child management page and clicking on the key icon, then choosing the role the contact will have.
1.5 Adding Payment Method
To ensure continuity of your service, you will need to add your payment details to your Parent account.
Note: Only the company administrator can access the subscription page and add payment details. They can add other billing addresses to allow them access to the subscription page.
How is my payment calculated?
Your payment is calculated using the following method:
-
The system records the number of active children at the beginning of each subscription period. The number is then multiplied by the rate per child.
-
The number of active children is checked by the system on a daily basis and one of the following takes place:
-
If the number of active children has increased, extra fees are added to the invoice for the following month.
-
If the number of children has decreased, the system will deduct the fees for the following month.
Subscription Page
The subscription page with all your payment history and payment details can be found in one of two places depending on your subscription type.
Company Subscription
-
Click on your profile picture at the top right corner
-
Choose the Show more option
Finally, click on the Show button next to the Subscription icon. You will be directed to your subscription page.
Institute Subscription
-
-
Click the Show button next to the Subscription tab
Add Payment Method
Once you are on the subscription page you can add your payment method by following these steps:
-
Click on the Payment Method tab
-
-
Click the Add Card button
1.6 How to contact support
If you have any questions about our product, please send us a message we are more than happy to help you find the answers needed.
Please follow the below steps through both the mobile application and portal:
-
Click on your profile icon in the top right corner.
-
3. Choose New Conversation and then Send a Message to the Customer Support team, or search for articles in the search bar down below Find an answer yourself.
Email Support
Not finding what you are looking for in the Help Center? Our support staff is standing by to help! You can email support anytime, and we will work to get back to you as quickly as possible during normal business hours.
Please make sure When emailing support, to include a detailed description of your question or issue. Any additional resources, such as screenshots, videos, or names, and emails of the impacted users.
Working Hours
Our working hours are Sunday - Friday from 6:00 am to 12:00 am (GMT+2). If you contact us after working hours you can leave a message or email us, and we will get back to you the next working day.
You should receive a response within a few minutes during the support hours unless the support volume is high.
1.7 Introducing parents to Parent APS
When you invite parents to Parent APS they receive an activation email with a link to set their password. We recommend that you send out an introductory email introducing the application to parents.
Email Template
Subject line: Introducing Parent
Dear Parents,
We are so happy to announce that we are now using Parent App to keep you and your child connected throughout the day. We made the move to ensure that our teachers focus solely on the children instead of wasting time filling out reports. You will get instant reports of what your child is doing, so you don't have to worry and make regular calls to the nursery. With Parent, you will have a complete overview of your child's growth, online payments, invoices, and tracking outstanding payments. All of this is available in one application available in Google Play and the Apple Store.
You will receive an activation email inviting you to the application. Once you activate your account, you will have access to your child's progress and activities throughout the day.
We're excited about using this all-in-one system and hope you enjoy it!
Thank you!
1.8 Check-in Application
What is the Check-in application?
The Check-in App is a standalone application that can be used on an iPad or tablet for parents and staff to check in and out. We recommend placing/mounting the device in the reception or the drop off area (this could be outside the classroom).
Download the Check-in Application
To use the Parent Check-in application your device must meet the minimum requirements.
Sign in to the Check-in Application
The check-in application has its own unique username and password that can only be accessed by the admin. To get your check-in application username and password follow these steps:
-
-
-
Click on the Show button below the Check-in App icon
-
Use the username and password to log into the check-in application
Check-in Application Options
The check-in application can be used by both staff members and parents to sign in and out. You can choose to lock the application so that it requires the staff members and parents to use their 4 digit pin code to check-in and out.
2. Center Setup
2.1 View and Edit Institute Information
How to edit your institute(s) information
To view and edit your institute's details go through these steps:
Click on Options, then under your institute name click on See all details.
View and Edit Details
Now you can view and edit institution details by filling in the fields you want to change.
-
Currency: Choose your institute billing currency.
-
IBAN: Add your institute international bank account. number
-
Contact Person: the name of the institute's contact person. Only editable by company admins.
-
Email Address: the email of the institute's contact person.
-
Website: Add your institute's website.
-
Latitude: Add the institute latitude from the map.
-
Longitude: Add the institute longitude from the map.
-
Timezone: Choose the time zone that your institute is in.
-
Week Start: choose the week start day for the institute.
-
Check-In Diameter: the maximum diameter allowed for a child/teacher to check in from.
-
Date Format: choose the date format.
-
Time Format: choose the time format.
-
Curriculum: Choose which curriculum your institute follows.
-
Show week numbers: If you would like to show the week numbers just turn the toggle on.
-
Don't allow contacts to check children in and out: If you do not want the parents to check their children in/out all by themselves just turn the toggle on.
-
Limit attendance schedule for parents: If you do not want the parents to control/add sick/vacation leaves to their child's attendance turn the toggle off.
-
Enable GDPR features: when enabled, you can select how long the system keeps data for withdrawn children before removing them entirely from the system.
-
Set expiry date: Set the expiry date for the GDPR feature (this will erase all the sensitive data after your selected period).
-
Don't allow parents to manage child data: If you do not want the parent to modify their child's data just turn the toggle on.
-
Don't allow parents to manage contacts: If you do not want the parents to add/modify their child's contacts turn the toggle on.
-
Enable comments on Newsfeed by Default: If you would like to enable comments on all the posts turn the toggle on.
-
Enable Parent To Staff Private Conversation: When Enabled, The parents will be able to send private message to the staff members. Otherwise the parents can message the staff members only through the available channels.
When you are done, click the Save button.
2.2 Institute(s) Opening Hours
Here is how to manage your institute(s) opening hours
Log in to Parent
Use your username and password to log in to your Parent account.
Choose an Institution
-
Click on the name of the institution in which you want to edit its opening hours.
Choose Options
-
Click on Edit next to Opening hours
Manage Opening Hours
-
Click on edit, then enter the institute's operating hours
-
For weekends mark on √ for the desired days
Finally, click the Save button.
2.3 Check-in Diameter
Here you will learn how to change your institute check-in diameter.
Log in to Parent
Use your username and password to log in to your Parent account.
Choose an Institution
Tap on the name of the institution in which you want to edit its opening hours.
Choose Options
Click on See all details under the institute profile picture
Scroll down to Check-in diameter
Select the desired check-in diameter (in meters), and then click on Save.
2.4 Manage Institute Closing Days
Here you will learn how to manage the institute's closing days
Go to Options
Click on show under Closing days
-
Insert the start and end dates of the institute closing days.
-
Add description/reason for the closing day.
-
Select a type (Holiday, Closing day, Training day) for the closing day from the dropdown list.
-
Click on +Add Closing Day.
2.5 Edit Room Details
How to edit your institution(s) room details.
Use your username and password to log in to your Parent account.
Choose an institution
Click on the name of the institution that you want to edit room details.
Choose options
Click on Show under Rooms.
Click the Settings button next to the room you want to edit. You will be taken to the page with the class information.
Now you can edit all the room details including:
-
Photo: you can upload a photo.
-
Room name: you can change the room name.
-
Room description: you can add a room description.
-
Phone number: you can add a phone number to the room.
-
Room capacity: you can choose the capacity of children in the room.
-
Staff ratio: you can choose the ratio of staff to children in the room.
-
Statuses: You can choose the statuses that are associated with the room.
-
Statuses viewed by parents: you can choose which status parents can view.
When you are done, click the Save button.
2.6 Room Overview
Here you learn how to learn more about the room overview
Log in to Parent
Use your username and password to log in to your Parent account.
Choose an Institution
Click on the name of the institution in which you want to check the room overview.
Click on Dashboard
Scroll down to the rooms and groups
The Graph
You can find the projections of the check in's and the check out's of the children so you will be able to understand the peak hours and assign the staff members accordingly. You will be able to find several helpful data such as staff ratio and the number of staff and children.
Using the information bar, you will be able to view more info such as the check-ins and the sick leaves plus you will be able to view birthdays and vacations of the children.
You will also see all the rooms and groups assigned to you.
2.7 Delete a Room/Class
If you want to delete a room/class from your center(s), follow this:
Go to Options
-
Click on Show under Rooms
-
Click on the Settings button next to the room you want to edit. You will be taken to the page with the room/class information.
-
Scroll down and click the Delete button.
-
A warning pop-up message will appear, press Yes to confirm.
**Note: To delete the room, you have to make sure no children or staff members are assigned to it.
2.8 Add/Create Rooms in your Center(s)
How to add a class(es) to your institution(s), from Options or Dashboard.
From Options
Choose an Institution
Click on the name of the institution that you want to add a room to.
Choose Options
Click on Show under Rooms.
-
Type the room name in the Room Name box.
-
The room will appear in your room list.
From the Dashboard
Choose an Institution
Click on the name of the institution that you want to add a room to.
You will be automatically directed to the dashboard.
-
-
Click on +Create New Room
-
Write the room name, and then click on create.
Et viola the new room is added now to your institute.
2.9 Create a Group
If you want to create a group follow these steps:
You may have children who take part in a specific activity such as football or dance, children who come in for only the afternoon and you want to group them together. With groups, you can easily manage children and staff within a group.
Log in to Parent
Use your username and password to log in to your Parent account.
Choose an Institution
-
Click on the name of the institution in which you want to add a group.
-
-
Scroll down to the Rooms/Group section
-
Scroll down, then click on +Create New Group
-
Add the desired group name, then click on Create.
The group will be added to your Institute groups' list.
2.10 Add/Remove Member of a Group
Here you will learn how to add/remove a member (child/employee) to/from a group.
Go to Dashboard
-
Scroll down to the Rooms/Group section.
-
Click on the desired group you want to add/delete children/staff member
Then click on Manage group member icon
Adding Children/Staff member
-
Click on the Children tab.
-
Tick the box next to the child profile you want to add to the group.
-
-
-
Tick the box next to the staff member profile you want to add to the group.
-
Remove Children/Staff member
-
Click on the Members tab.
-
Click on the delete button next to the child/staff member profile you want to remove from the group.
2.11 Edit a Group
If you want to know how to edit a group, here's how:
Log in to Parent
Use your username and password to log in to your Parent account.
Choose an Institution
-
Click on the name of the institution in which you want to edit a group.
-
-
Scroll down to the Rooms/Group section
-
Click on the group you want to edit
Then click on the below icon to edit the group.
-
You will be directed to the group's information
-
Group name: you can edit the group's name.
-
Group description: you can write more details about the group.
-
Group staff ratio: set the staff-to-child ratio for the group. For example, if you need 1 teacher to every 5 students set the ratio to 5.
-
Select the statuses that will be registered in the group: set which statuses teachers can register in the group.
2.12 Delete a Group
These steps will help you to delete a group.
Go to Dashboard
Scroll down to the Group section
Click on the desired group you want to delete
Then click on the below icon to edit the group
-
Scroll down to the Group section, then click on delete.
2.13 Add A New Branch
You're expanding, that's great! How can we help?
Book a session with one of our SMEs to understand what is needed to get your new branch onboarded
2.14 New Hire Training Request
Easily book training for all your newly hired staff through our calendar here
3. Account Management
3.1 Forgot Your Password
To reset your password if you forgot it
-
-
Click Forgot your password
-
On Forgot Password, enter your email address and click Reset.
-
We'll send you an email with instructions to reset your password. If you no longer have access to the email address associated with your account please contact your system admin to change it.
-
Check your email and follow the instructions to reset your password.
3.2 Generate New Pin Code
Here you learn how to generate a new pin code/ change the existing pin code.
If you forgot your pin code and would like to generate a new one follow these steps:
Log in to Parent
Use your username and password to log in to your Parent account.
-
Click your profile icon on the top right corner.
-
Tap Click the PIN/ Account Settings option from the drop-down menu.
-
You will find the existing pin code or you can generate a new pin code by tapping on Generate New Pin code button.
3.3 Change or Reset your Password
Change your Password
To change your password when you're already logged into your account:
-
Click your profile picture icon in the top right corner of your screen.
-
Select Account settings from the drop-down menu.
-
Type your current and new password and click the Save button.
Reset your Password
-
-
Click Forgot your password.
-
On the Forgot Password screen, enter your email address and click Reset.
-
We'll send you an email with instructions to reset your password. If you no longer have access to the email address associated with your account please contact your system admin to change it.
-
Check your email and follow the instructions to reset your password.
3.4 Switch Accounts
Often you can have more than one account on Parent. To switch between accounts follow these steps.
-
Click your profile icon on the top right corner.
-
Click the Switch account option from the drop-down menu.
If you haven't already added another account click the Add account icon and type in the account information.
3.5 Sign-in Pin Code
The pin code was designed to get rid of the hassle of constantly typing your password. It's a 4-digit code that replaces your password so you can easily sign in or switch between accounts. To get a pin code follow these steps:
-
Click your profile icon on the top right corner.
-
Click the PIN option from the drop-down menu.
If you would like a different pin code click the Generate New Pin code button.
3.6 Change Account Language
Parent has many languages to choose from so you can have the interface in your preferred language.
-
Click your profile icon on the top right corner.
-
Tap on the Account settings option from the drop-down menu.
Select the language you want the interface to be in and click the Change language button at the bottom of the language list.
3.7 Change Notification Settings
Parent™ has both email and push notifications to change which notifications you receive simply follow these steps.
-
Click your profile icon on the top right corner.
-
Click the Account settings option from the drop-down menu.
-
Click the Notification tab.
If you want to receive a notification keep the checkmark next to the notification. To remove it click the checkmark and make sure the box is empty. When you are done click the Save button.
3.8 Change Account Details
You can change your account settings in Parent by following these steps:
-
Click your profile icon on the top right corner.
-
Click the Account settings option from the drop-down menu.
3.9 Clear Portal Cache
When you use a browser, like Chrome, it saves some information from websites in its cache. Clearing them fixes certain problems, like loading or formatting issues on sites.
-
On your computer, open Chrome.
-
At the top right, click More.
-
Click More tools > Clear browsing data.
-
At the top, choose a time range. To delete everything, select All time.
-
Next to "Cookies and other site data" and "Cached images and files," check the boxes.
-
3.10 New Sign-ups
To Create your staff/teacher account follow the below easy steps:
-
Your institute will add your email to the institute account
-
You will receive an email with sign-up instructions
-
**If you did not receive an invitation email with sing up, No need to worry.
by following these simple steps:
-
-
Scroll down to the bottom of the page and click on Help Center
-
You will be directed to another page, click on the blue bubble to start a conversation with our support team.
4. Staff Management
4.1 Check Staff Members In and Out of the Institution
Using the Check-In Application
Using the Check-In application/ website on your tablet or iPad follow these steps.
- Select the Staff icon.
- Select the staff member profile that is checking in/ out of the institution.
- Select the checking in time.
- Select the time the staff member is expected to check out.
- Press the Check/in button.
Note: follow the same steps for signing out your staff members. The Sign-in button will be replaced by a Sign out button.
Using Parent™ Application
Using the Parent™ application available in any of your rooms follow these steps.
Select a Room
-
Select the room that the staff member is checking into.
-
Select one or multiple staff members by pressing on their photos and then click the Status icon from the menu.
-
Press the Check in or Check out icon.
Using the Website
Log in to Parent
Use your username and password to log in to your Parent™ account.
Select a Room
-
Select the room that the staff member is checking into.
-
Select one or multiple staff members by pressing on their photos and then click the Status icon from the menu.
-
Press the Check in or Check out icon.
4.2 Remove an assigned role from a staff member
To remove an assigned role to a staff member, go through the following steps:
-
Click the More Options menu (3 vertical dots) next to the staff member you want to assign a role to. Then, choose the Change Role option.
-
A popup will appear with the staff member's information along with the roles they can be assigned to
**Note: If you would like to remove access from a staff member, scroll down and select the check-mark next to the No access and click the Save button.
4.3 Control Staff's Room Access
The Room Management option, you can now control which rooms your staff members can access to report daily activities or post to the children in that room.
To choose which room/s your staff member has access to, follow these steps:
-
Go to the Staff & Access control page by clicking on the Options icon then clicking the Show button below the Staff icon.
-
Find the staff member's name
-
Select the drop-down menu under the Manage Rooms column
-
Choose the rooms you want to allow your staff member to access
4.4 Delete/Remove Staff Member
Click on Options
-
Click Edit on the upper right corner of the staff member's profile picture.
-
Add the Last date that the staff member will work at the institute.
-
4.5 Edit Staff Member Profile
Click on Options
-
Tap on the staff member profile that you want to edit.
-
Click Edit under the staff member profile picture.
-
Room: Change the room that the staff member is assigned to it.
-
Check-in: Check in the staff member manually.
-
Send Message: Send a private message to your staff member.
-
Report Sick: Report sick leave for the teacher and choose the start/end of the sick leave.
-
Report a vacation: Report a vacation leave and choose the start/end date of the vacation.
-
Has Child Sick: you can report a sick report if the staff member's child is sick and choose the start/end date of the sick leave.
-
Registration date: Set the registration date of the staff member.
-
Last date: Set the last working day (Withdraw) for the staff member at the institute.

-
Name: Change/edit the staff member's name.
-
Date of birth: Edit/Add the date of birth of the staff member.
-
E-mail address: Add the email address of the staff member.
-
Birthplace: Add the birthplace of the staff member.
-
Nationality: you can select the nationality of the staff member from a drop-down list.
-
Mobile Number: Add the mobile number of the staff member.
-
Phone Number: Add a phone number to the staff member profile.
-
Work number: Add a work number to the staff member profile.
-
Street: Add the street/address of the staff member.
-
Zip Code: Add the zip code of the staff member's address.
-
Country: Add the country of the staff member's address.
-
City: Add the city of the staff member's address.
-
Preferred language: Add the preferred language to the staff member.
-
Other Language: You can add another language to the staff member.
-
Special notes: You can add special notes to the staff member profile.
4.6 Add A Staff Member Profile
Now that you have created roles and added rooms to your institution you can add staff members and assign them to the rooms.
Click on Options
-
Tap on Show under Staff icon
-
-
A pop-up window will appear with more details
-
Staff Name: Add the new staff member's name
-
Room: you can pick from the drop-down list the room you want to assign the staff member to.
-
Role: You can pick which role you want to assign for the newly added staff member.
-
E-mail Address: You must add the staff member's email, as it's a required field to gain access to the system.
Click on Save and Voilà! The new staff member is added to your institute.
4.7 Create a Role
We, at Parent, designed a Roles feature to give you full control of the level of access users get in your company. Only a Company Admin, for example, the owner of an institution/nursery can create, edit, and assign new roles. The roles can be assigned across your whole company or for users involved in a specific institute. Let’s show you how!
Click on Options
Select Show, next to Roles
The Roles page is a table that is grouped by the type of access that can be granted to each role. For example, the Basic category lets the administrator grant access to basic child and employee information to specific roles. The rest of the columns are for the different roles created by the administrator and the access they have been granted.
A new column will appear with the name of the new role.
The new role will not have any granted permissions. Please read the Edit Role section to learn how to grant permissions.
Note: You can grant the same type of access to a group of teachers, or accountants by giving them the same role. Read this article to learn how to edit the roles of staff members.
4.8 Use Staff Schedule Report
The Staff Schedule Report gives you an overview of your institute's staff schedule and the staff's actual working hours and can be exported into different formats for bookkeeping and HR purposes. Follow the steps below to view and use the Staff Schedule Report:
Go to Tools
-
Click on Show under Staff Schedule
Once you click on the Report tab, you will get an overview of your staff working report.
-
Select date range for the report you would like to see
-
Click on Group By to choose how to view the report:
-
None (default): Displays a detailed view day by day for each staff member.
-
Date: Displays a summary of each day.
-
Staff: Displays a summary for each staff member.
-
Use the report to see the scheduled working hours vs the actual working hours, as well as the variance.
-
You can also see the total number of sick days and vacations among the whole staff, as well as for each individual.
-
Use Staff and Staff Status to filter the staff by name or by status.
Export Staff Schedule Report
To export the report, please follow the steps below:
-
A pop-up window will appear where you can choose the preferences for your report
-
Date range: choose the date range for the report
-
Staff: choose the staff members
-
Target data: choose which data should be displayed in the report
-
Detailed level: choose if you want to show the daily detailed information, daily summary or the staff summary. Note: These are based on the same view as the options under "Group by" in the overview
-
Document Format: choose between PDF, Excel or CSV
When you are done, click on Export.
4.9 Staff Working Hours
Spend less time recording, tracking, and processing working hours for your employees. Here is how you can view the staff working hours reports.
Choose an Institution
-
Click on the name of the institution you want to view the staff working hours for.
-
You will be directed to the Dashboard of the selected institution. If you only have one institution you will be directed to the Dashboard by default.
Go to Staff Working Hours
Click on the Tools icon and then click on the Show button below Working Hours.
Download Attendance Report
To download the attendance report in CSV format follow these steps.
-
Select the date you want to be included in the report
-
-
-
If you want the report to include more details such as user IDs select the check-mark next to Detailed CSV.
-
The CSV file will be downloaded to your device and you can open it and view the data at anytime.
Edit Attendance Record
To edit an attendance record follow these steps:
-
Expand the attendance report and find the attendance record you want to edit.
-
Click on the attendance record you want to edit.
-
A popup will appear, click on the Edit button.
-
Edit the check-in/check-out times.
-
Hint: You can add multiple check-in/check-out times by clicking the Add Check-in/out button
4.10 Delete a Role
Click on Options
Select Show, next to Roles.
-
Select the desired role you want to delete from the drop-down list.
-
Tap on the selected role name, click on the three dots next to the name, and then click on Delete.
-
A pop-up will appear to confirm the action. Click Yes.
The role will disappear from the Roles page.
Disclaimer: make sure you want to delete the role because it can't be restored.
4.11 Edit a Role
Click on Options
-
Select Show, next to Roles
-
Select the desired role you want to edit from the drop-down list.
-
If you want to edit the name only of the role, just tap on the name, then tap on the below checkmark right next to the role name.
To give the role-specific functions, follow these steps:
-
Select the checkmark next to the type of function you want to grant to the role. The checkmark turns blue when the function is active.
Note: To cancel all changes done to the role, click X at the top right of the role name.
View Users Assigned to Role
-
To see the users assigned for each role, click the number next to the role name.
-
A pop-up window will appear that shows the number of users assigned to the role
The example below shows there are 22 users assigned to the role named Staff Member.
4.12 Assign Staff Member to a Role
Staff members that use Parent for their work at your institution need to be granted specific permissions. Different staff members may require different permissions which are easily customized through roles. If you haven't already created roles, please learn how to create roles.
To assign staff members to a role, go through the following steps:
-
Click on the three dots next to the staff member profile that you want to edit his/her role, then tap on Change role.
-
A pop-up with the staff member’s information will appear along with the roles that they can be assigned to.
-
Select the checkmark next to the role you want to assign the user to and click the Save button.
4.13 Restrict access to Parent ApS Application
This new feature will help you control both your staff members from accessing the application, and from checking in/out anywhere at any time in just one step.
-
Then click on Show next to Roles
-
Select the role you want to edit from the dropdown list
-
If you would like your staff members, to check in/out themselves or access the application anytime and anywhere then make sure to give them this permission "Acces the app anywhere"
-
If you remove the permission from your staff members they will not be able to use Parent unless they are checked in by the staff who has the permission to check-in other staff members, or they can check-in themselves through the Check-in Application. They will receive the following message if they try to access Parent when they are not checked in.
4.14 Add Staff Schedule
The administrator's most time-consuming job is scheduling. A staff schedule is the easiest way that enables you to set schedules for your staff members. It can be a repeatable or custom schedule for each member, also it helps everyone to know which room they are assigned to and the exact working hours.
Click on Tools
-
Tab on Show under Staff Schedule
-
Select the week you want to add a schedule to it, then click on Schedule
-
A pop-up window will appear to select all staff members or to select a specific staff member.
-
Select the start and end date you want to add staff schedules
-
Choose the weeks that you want to repeat on the schedule
-
Choose Append if you would like to just add the schedule, or you can choose Overwrite if you would like to replace the already added schedule in the same chosen week.
-
The start day of the week and list of the staff members you chose to add a schedule to them.
-
Here are your institute operating hours
After you finish make sure to click on Submit.
If you would like to edit a staff role and give her/him permission to view/edit the staff schedule, check how to edit a role and make sure to mark the desired permission:
-
To manage staff schedule, make sure to mark the permission "Manage staff schedules"
-
To only view the staff schedule, mark View staff schedule.
5. Development And Learning
5.1 Two Years Assessment
Tap on Show under Children
-
Tap on the child profile that you want to create two years assessment.
-
A Child with no 2 years of assessment
-
Click on New, and select Two years check
-
When clicking on Two Years Check; you will be able to write the assessment of the child
-
You can add more details in the description/message box
-
Select different areas of the two-year check, and you can also attach any files and/or images you want to include with the two-year check.
-
You can change the date of the assessment by selecting the Date field.
-
-
You can choose to share/don't share with the parents
Click Post button when you are done.
5.2 Delete an Observation
Go to Options
Click on Show under Children
-
Tap on the child profile that has an observation you want to delete.
-
-
Scroll down to the observation you want to delete, then click on the 3 dots right next to the added observation.
Tap on delete, and you are done.
5.3 Create an Observation
The observations feature enables staff members to log observations in accordance with the institute learning frameworks. Also, it measures the progress against specific developmental milestones.
Go to child profile
-
Click on the journey tab.
-
Tap on New, and select Observation.
-
Select your preferred framework, then tap on curriculum links, and select a milestone (Emerging, Developing, or Secure) to add your observation.
-
Once you are done clicking on Send for review, the assessment will be sent directly to the institute Admin for review. Or, you can save it as a draft for later by clicking on Save as Draft.
**Note: You can choose whether if you want to share this assessment with parents or not by clicking on Don't share with the parents, and disable/enable comments.
Pro tip: Staff members with permission to post directly have the option to send the assessment for review to admin or can click on Post directly.
Here is another way to create an observation
Click on Newsfeed
Repeat the same steps, when you are done click on Post.
** You can save the added observation as a draft.
If you want to roll out the previously drafted Observation
-
click on Newsfeed, and then post Observation
-
, and then you will find the drafted observations in a new pop-up window.
5.4 Approve/ Edit an Observation
Click on Tools
Click on Show, under Child Development.
Here you will find all the pending observations for approval.
If you would like to approve the observation directly without any changes; choose the observation that you want to approve, then click on Approve & Send down below.
If you would like to add some changes, click on Request Changes.
You will receive a confirmation message at the top of your screen confirming sending the observation back to the creator to edit it.
** Make sure to tick/untick Don't share with parents,
**You can enable/disable comments
5.5 Create an Assessment
-
Click on the journey tab., New, then Assessment
A pop-up window will appear, tap on the curriculum links button at the bottom of the pop-up window.
-
Choose links you want to add to this assessment
-
Upload a file (if needed) in addition to adding the curriculum.
Once you are done clicking on Send for review, the assessment will be sent directly to the institute Admin for review. Or, you can save it as a draft for later by clicking on Save as Draft.
**Note: You can choose whether if you want to share this assessment with parents or not by clicking on Don't share with the parents, and disable/enable comments.
Pro tip: Staff members with permission to post directly have the option to send the assessment for review to admin or can click on Post directly.
6. Child Management for Admins and Staff
6.1 View Child’s Pick Up Information
Parents can assign someone a pickup role so a child can be picked up by someone besides the parents.
To view information about who will be picking up the child on a given day you can follow these steps.
Select a Room
Select the room that the child is in from the list of rooms listed under your Dashboard.
Go to Child Profile
Select a child from the list of children in the room and a menu will appear, click Profile.
You will be able to see who will be picking up the child in the Activity tab.
**Note: The child has to be checked in, in order for you to see the pickup info.
You can edit and assign the contact who will pick up the child by clicking on the pickup activity and assign the contact and choose the pickup time.
**Note: This information is also accessible through the Dashboard and appears under the child's photo icon in the room they are assigned.
6.2 Report a Sleep/Wake-up Status of a Child
Click on Dashboard
-
Click on the room that has the child you want to add Sleep report to her/his profile.
-
Select the child profile or multiple children by clicking on their profile picture.
-
Click on the Status, then tap on Sleep.
-
A popup with the selected child/children will appear Sleep tab and Wake-up tab.
-
To report when a child got a nap select the Sleep tab.
-
Click on the Select All button, and then add the date, and time
-
You can add notes if you want.
-
Click Submit and the status is reported.
**Note: if you are reporting times for multiple children you can always type the time and then click Select All.
Wake-up Report
-
-
Select the room that has the child you want to add a wake-up report to her/his profile.
-
Select the child profile.
-
Click on the Status, then tap on Wake-up.
-
Select the nap duration, or click on the edit button if you want to add a specific duration or add a custom comment.
And then, click on Submit.
6.3 View a Child’s Leaves Graph
Parent gives you an easy-to-understand graph with all child's leaves. Easily track sick and vacation reports for any child by going through the following steps.
Select a Room
Select the room that the child is in from the list of rooms listed under your Dashboard.
Go to Child Profile
Select a child from the list of children in the room and a menu will appear, click Profile.
Go to the Leaves Graph
Please scroll down to find the Child’s Leaves Graph on the lower right side
-
Planned Holidays, Vacation Days, and Sick Days all show in a graph.
-
Green bars are for planned vacations while red bars are for sick leaves.
-
Hovering the mouse on a graph bar will show the number of leaves in this month.
6.4 Report a Toilet Visit - Diaper Change
As a staff member, you can easily report a child's toilet visits and/or diaper changes by following these steps.
Click on Dashboard
-
Click on the room that has the child you want to add Toilet report to her/his profile.
-
Select the child profile or multiple children by clicking on their profile picture.
-
Click on the Status, then tap on Toilet.
-
A popup with the selected child/children will appear diaper change tab and Toilet visit tab.
-
Select Diaper change to report a diaper change or Toilet visit to report a toilet visit.
-
Choose the type of toilet visit or diaper change for each child selected by selecting the checkmark.
-
The types that can be chosen are Dry, Wet, and BM (Bowel movement) for Diaper change, or Tried, Wet, BM (Bowel movement) for Toilet visit.
Click Submit and the status is reported.
6.5 View Child's Daily Report/Activities
Since the calendar carries all of the institute's or room activities a daily report was designed to filter out each child's daily activity. This makes it easy to know what the child has done throughout the day.
To access a specific child's daily report follow these simple steps.
Select a Room
Select the room that the child is in from the list of rooms listed under your Dashboard.
Go to Child Profile
Select a child from the list of children in the room and a menu will appear, click Profile.
All the activities of the child will appear on this page in a daily report.
6.6 Report Vacation Days for Children
Click on Dashboard
-
Click on the room that has the child you want to add Vacation Report to her/his profile.
-
Select the child profile.
-
Click on the Status, then tap on Vacation.
-
A popup with the selected child/children will appear.
-
Select the start and end dates of the vacation days you want to report. You can also add a note.
Click the Submit button when you are done.
Through the Child's Profile
-
Select one child by clicking on their photos and then click the Profile icon from the menu. Selecting more than one child will dim the Profile icon.
-
On the child’s profile page click the Activity tab, then tap on Vacation.
-
Select the start and end dates of the vacation days you want to report. You can also add a note.
Click the Submit button when you are done.
6.7 Report an Ouch Status of a Child
Sometimes children get hurt while playing at the nursery. You can report these incidents using the following steps.
Go to Dashboard
-
Select the room that has the child you want to add Ouch report to her/his profile.
-
Select the child profile.
-
Click on the Status, then tap on Ouch.
**Note: You can add a custom time and date, also, you can write more details on the incident in the comment box.
Click Submit, and you are done.
6.8 Add a New Child Contact
Choose Options
Click on show under Children.
-
Click on the child profile you want to add a new contact to the child profile information.
-
Tap on Contacts tab, and then +
-
Fill in the required contact information and click the Save button when you are done.
Name: Add the contact name.
Relation: Add the child's contact relation.
Mobile number: Add the mobile number of the child's contact.
Email: Add the email of the child's contact.
Role: You can choose the contact role whether he/she is a *Parent, **Family, ***Pick-up, or not giving them a role by choosing No access.
*Parent:
The contact who has the parent role has access to everything regarding the child. He/she can view photos, read posts, get private messages, receive invitations, and the overview profile of the child.
** Family:
With the family role, you are allowed to pick up the child as well as view photos and posts sent to the child. This is recommended for grandparents and other family members.
*** Pickup:
With the pickup role, you are only allowed to pick up the child.
**Note: You can also navigate to the Dashboard and choose the room the child is in. Select the child then select Profile, and follow the same steps.
6.9 Report a Meal Status of a Child
Let a child's parents know about their daily food consumption by reporting their meals
Go to Dashboard
-
Click on the room that has the child you want to add Meal report to her/his profile.
-
Select the child/ children profile by clicking on their profile picture.
-
Click on Status, then Meal.
Now click the Meal icon from the menu that appears. A popup with the selected child/children will appear
-
Select from the header the meal you are reporting.
-
The system here is reminding you with meal items already added to the chosen meal, choose the child's consumption by selecting one of the options listed: Full, Half, Some, or None.
-
You can choose to Select all to report the same meal consumption for all children selected.
-
Click the Save button when you are done.
If you want to add more items to the child meal, click on the edit button
-
Select the desired items from the list
-
You can also add new items to the child's meal
-
If you want to delete an item, click on X next to the item you want to delete.
If you want permanently delete an item from the meal list, click on delete button next to the meal in the list.
6.10 Report a Trip Status of a Child
Institutions often have trips arranged for the children. To report a child's trip status simply follow these steps.
Click on Dashboard
-
Click on the room that has the child you want to add Trip report to her/his profile.
-
Select the child profile or multiple children by clicking on their profile picture.
-
Click on the Status, then tap on Trip.
-
You can add notes if you want.
Click Submit and the status is reported.
**Note: if you are reporting times for multiple children you can always type the time and then click Select All.
6.11 Report a Bus Status of a Child
Click on Dashboard
-
Click on the room that has the child you want to add Bus report to her/his profile.
-
Select the child profile or multiple children by clicking on their profile picture.
-
Click on the Status, then tap on Bus.
-
A popup with the selected child/children will appear on bus tab and off bus tab.
-
To report when a child got on the bus select the On bus tab.
-
Click on the Select All button, and then add the date, and time from the menu to insert the time they got on the bus.
-
You can add notes if you want.
-
Click Submit and the status is reported.
**Note: if you are reporting times for multiple children you can always type the time and then click Select All.
6.12 Add/Edit Child's Health Information
You can view all details related to a child's health by following these steps:
Go to Child Profile
Select a child from the list of children in the room and a menu will appear, click Profile
Click on show under Children.
Type the child name in the search bar, and then tap on the child profile.
Click on About tab, Health info, and then Edit
-
Insurance number: Add the child insurance number.
-
Allergies: add any allergies the child has.
-
Tolerates penicillin: toggle the switch on if the child tolerates penicillin or not.
-
Special dietary considerations: Add any special dietary consideration notes to the child profile.
-
Vaccinations: Add the vaccinations that your child has received.
-
Doctor Details: add child's doctor information including name, phone, and address.
-
Special health notes: You can add any special health notes about your child's health.
When you are done click the Save button.
6.13 Edit Child's Contact Details and Role
Go to Options
Click on show under Children.
To Edit Contact Details
-
Click on the child profile you want to add a new contact to the child profile information.
-
Tap on Contacts tab, then on the 3 dots next to the contact that you want to edit his details, or tap on the contact that you want to edit his/her details then click on Edit
To Edit Contact Role
-
Click on the Role icon under the contact profile
-
A new pop-up window will appear with the roles available to edit.
-
Pick the desired role that you want to grant to the parent.
-
6.14 Add/Edit Child Registration Information
Go to Options
Click on show under Children.
Click on the child profile you want to add or/and edit his/her profile information.
Tap on About tab, Registration info, and then Edit
Settings: You can add which Institut the child will be assigned to it.
Registration Date: You can add/edit the child registration date.
Last Day: You can add the last date if you want to withdraw him/her on a certain day, or you can leave it blank and set the last date later on.
Groups: You can add the child to any group.
Once you are done, click on Save.
6.15 Report a Child Sick
Children can get sick and need to take a few days to rest. Keep track of attendance by reporting that a child is out sick.
Click on Dashboard
-
Click on the room that has the child you want to add Sick report to her/his profile.
-
Select the child profile or multiple children by clicking on their profile picture.
-
Click on the Status, then tap on Sick.
-
Select the start and end dates of the sick days you want to report. You can also add a note.
-
Also, if you want to add a custom comment, you can simply add it in the comment box below.
-
Click the Submit button when you are done.
Through the Child's Profile
-
Select one child by clicking on their photos and then click the Profile icon from the menu.
-
On the child’s profile page click the Report sick button.
-
-
Select the start and end dates of the sick days you want to report. You can also add a note.
-
Click Submit button when you are done.
6.16 View Child Media
Click on show under Children.
Search for the child profile you want to view her/his media
Now you can view all child profile details. Scroll down to view all media added to the child profile. To view any of the files simply click on it.
Et Voilà!
**Note: Any document or video shared by the institution through the newsfeed will be automatically added to the child's gallery. Photos will only appear in the gallery when the child is tagged.
6.17 Switch a Child from a Class to Another
As children get older they may need to be moved to different rooms at your institute.
You will be directed to the Dashboard of the selected institution.
Select a Room
Select the room that the child is in from the list of rooms listed under your Dashboard.
Switch Room
-
Select one child or multiple children by clicking on their photos and then click the Switch icon from the menu.
-
Select the room you are moving the child into.
-
-
Choose the class you want to assign the child for from the list of the classes, and then click on Submit.
*** You can also switch rooms through the Children under Options.
6.18 Moving a Child Between Branches
Having multiple branches is tough to manage so you shouldn't have to worry about moving a child between branches and what will happen to their data. With the move child feature, it's just a few clicks and the child will be moved with all their information.
To move a child from one branch to another follow these steps:
Go to Child Profile
Select a child from the list of children in the room and a menu will appear, click Profile.
Move Child
-
-
Choose the Registration info tab
-
-
Select Setting the child is moving to from the drop-down-menu
-
Choose the class the child is moving to
-
**Note: The child will become withdrawn from the current institute.
6.19 Report a Child's Mood
Children can have different moods during their day and you can easily report them using these steps.
Click on Dashboard
-
Click on the room that has the child you want to add Mood report to her/his profile.
-
Select the child profile or multiple children by clicking on their profile picture.
-
Click on the Status, then tap on Mood.
-
A popup with the selected child/children will appear.
-
Select the mood you want to report by clicking the circle under one of these options: Happy, Content, Fussy, and Sleepy.
-
Click Submit button when you are done.
6.20 Tag a Child in a Photo
When you create posts on your institutes newsfeed you might want to add photos to be shared with parents. All recepients of the post can see the photos, but you also have the option to tag specific children in the photos and parents can then display these photos in their childs gallery, instead of having to scroll back to old newsfeed posts.
To tag children, follow the steps below:
By using the Portal
-
Go to the Newsfeed from the top menu
-
Find the post with the picture(s) you would like to tag
-
Click on the picture to open it
-
A bar is displayed underneath the picture, click on Tag Children and choose the child/children you would like to tag
Once the name is displayed in blue, the tag is saved and you can close the picture my pressing on X in the top right corner.
Note: you can also remove a tag by pressing on the small X next to the child's name.
By using the App
-
Go to the Newsfeed from the bottom menu
-
Find the post with the picture(s) you would like to tag
-
Click on the picture to open it
-
Click on Tag Children underneath the picture
-
Use the search bar to find the child/children you would like to tag
-
Press on the child's name to tag him/her
-
To check who is tagged in a picture go to the tab Tagged
**Note: you can also remove a tag by pressing on the X next to the child's name under Tagged tab.
6.21 Check-in a Child
Click on Dashboard,
-
Click on the room that has the child you want to check-in in the institute.
-
Select the child profile or multiple children by clicking on their profile picture.
-
Click on the Status, then tap on Check-in.
-
Once you tap on Check-in, a pop-up notification will appear on the right at the top of your screen.
-
The selected child/children's profile color immediately will change to green.
-
Check-in timing will appear under the selected child/children profile picture.
6.22 How to Delete a Child Contact
Choose Options
Click on show under Children
-
Click on the child profile you want to add a new contact to the child profile information.
-
Tap on Contacts tab, and then tap on the three dots next to the contact name that you want to delete.
6.23 Child Attendance Reports
The detailed child attendance lets you see how many children were checked in, reported sick, reported on vacation, or even missed their check-out on specific days.
Choose an Institution
Click on the name of the institution you want to view the child's weekly attendance for.
You will be directed to the Dashboard of the selected institution. If you only have one institution you will be directed to the Dashboard by default.
Go to Child Attendance
Click on the Tools icon and then click on the Show button below Child attendance.
You can choose the Weekly or Monthly.
Download Attendance Report
To download the attendance report in CSV format follow these steps.
-
-
-
Selects the dates you want to be included in the report.
-
If you want the report to include more details such as gender, age, and nationality select the check-mark next to Detailed Excel.
-
The CSV file will be downloaded to your device and you can open it and view the data at any time.
Edit Attendance Record
To edit an attendance record follow these steps:
-
Expand the attendance report and find the attendance record you want to edit.
-
Click on the attendance record you want to edit.
-
A popup will appear, click on the Edit button.
-
Edit the check-in/check-out times, report sick or on vacation.
-
Hint: You can add multiple check-in/check-out time solts by clicking the Add Check-in/out button.
To Add Attendance Record to a Group of Children:
-
-
Select the children's profiles you want to edit their attendance record, then click Next.
-
-
-
Add your comment, then click on Submit.
6.24 Add or Remove Child
At this point, your institute(s) should be set up and you have created room(s). Now, it is time to add new children or withdraw ones who will be moving on.
Go to Options
Click Show button below the Children icon.
Add a New Child
-
Click on +Add Child, then add the following information:
-
Child name: Add the child's name.
-
Date of birth: Add the child's date of birth.
-
Gender: Choose the child's gender
-
Room: you can choose which room you want to add the child to.
-
Start date: you can choose the start date/registration date of the child.
-
Parent name: you can add the child-parent name.
-
E-mail: you can add the child-parent email address.
-
Role: you can pick which role you want to assign to the parent of the newly added child.
After you finish click on Save and the new profile will be added to your institute children list.
Withdraw Child
To withdraw a child, follow these steps:
-
Go to the child's profile page by one of the following ways:
-
From Options, click on Show under children, then type the name of the child you want to withdraw.
-
Go to the Dashboard and click on the class the child is in. Then, click on the child's picture and click on the Profile icon on the menu that appears.
Once you are on the child's profile page, follow these steps:
-
-
-
Click Edit on the upper right corner of the registration info. box.
-
Add Last date the child attended/will attend the institute.
Click the Save button.
A Withdrawn icon will appear beside the child's profile picture.
7. Billing and Invoicing
7.1 Billing Overview
Learn how Parent's billing platform will take your institute to the next level and see how it is designed to tailor to your needs!
In June we launched our Billing solution and have been adding to it ever since to make it a billing tool tailored to your needs.
Whether you charge by the hour, weekly, monthly, per term or yearly, Parent has your plan covered. We will go through each feature and how to use it in other articles.
Flexible Plans
Whether you offer fixed pricing or custom packages our billing system will work for you. Use the billing module to customize each child's plan and add the specific rates they will be invoiced. Assign multiple payers for each child and split the payments with any way you choose.
Reduce Manual Work
Streamline your billing process and reduce manual work. Avoid all human errors by automating your administrative duties. When you're dealing with paperwork it involves many steps and since it is being done by a human it is bound to have some errors. This can lead to incorrect invoices and billing amounts being sent to your clients.
Eliminate all the hassle and human error that can cost you thousands of dollars by automating your billing with the Parent billing tool.
Safe & Secure Data
When your data is stored in one of the top-rated secure servers in the world you don't have to worry about losing client data or invoices. Stop worrying about storing things on your computer and constantly fearing that with any issue the data will be lost.
Everything is stored in one place and is available right at your fingertips.
Standardize your Invoicing Process
Raise your hand if you have spent hours filling out data to generate an invoice. We know you've been there before that's why you just set the child's plan and then generate the invoice based on the plan.
Simply, all you have to do is log into your account and select the child you want to invoice, and click invoice! it's that simple and you can choose which of his assigned payers you want to invoice.
7.2 Billing: Manage Pricing Groups
What are pricing groups?
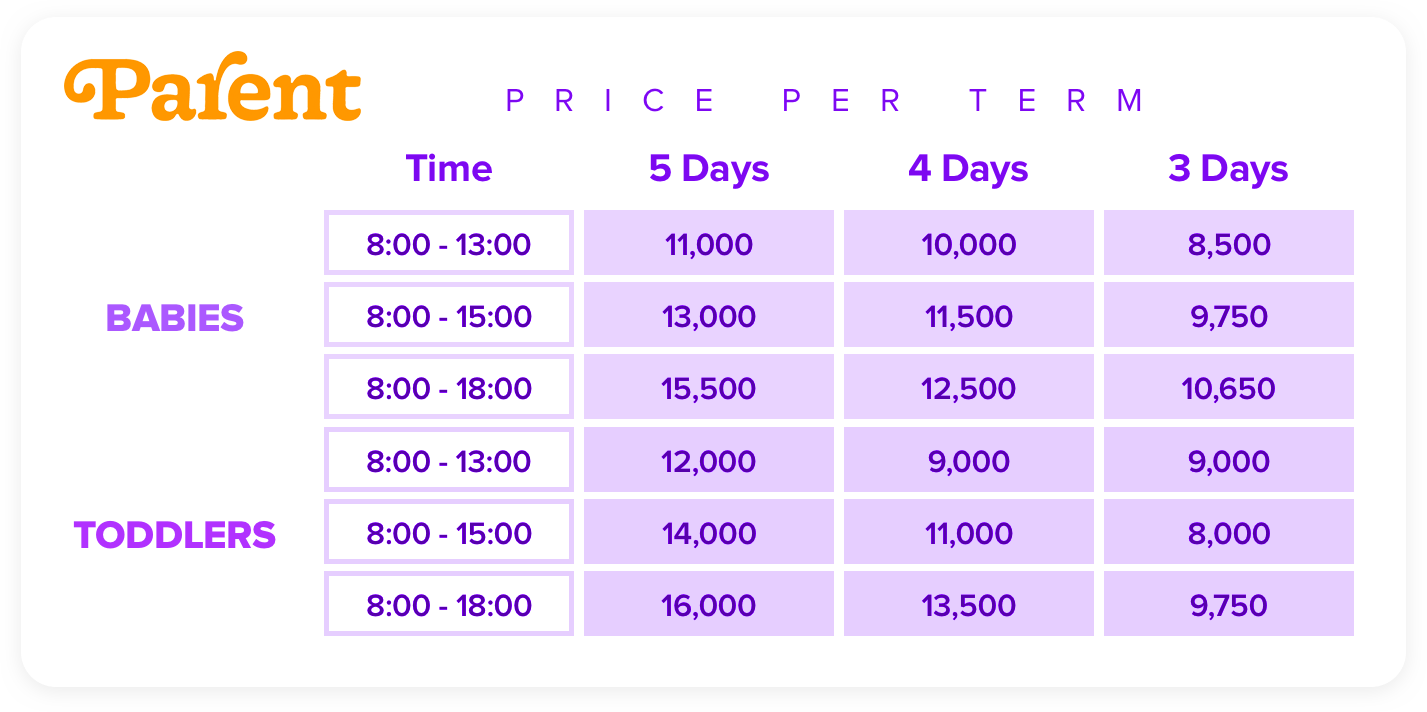
To explain pricing groups, let's go through an example. In the image below we have a sample fee structure with a few different types of packages. Check the sample fees and
In the above example, we charge babies that attend 5 days a week a different price than toddlers that attend the same number of days and hours a week. This would mean that we have two pricing groups: Babies and Toddlers.
Create Pricing Group
To create a pricing group/s, follow these steps:
-
Click on the Price Groups button
-
Click on +Add Price Group
-
Type the name of your pricing group
-
Click on the Save button when you are done
Pro-tip: A pricing group can also be based on different prices without age groups. For example, if you charge different children for the same time attended an extra 100$.
7.3 Billing: Manage Charges
Charges are any extra fees you apply, such as your registration fees or bus fees. A charge can be added to the child's plan and charged weekly, monthly or just once.
Create Charge
To create a charge, follow these steps:
Click on the +New Charge button and add the required fields:
-
Charge Name: The name of the fee you are adding, for example, you can create a registration fee.
-
Pricing: How do you charge for this part of the service? Is it a charge that's added to the invoice on a weekly basis? Monthly basis? Or a one-time charge.
Select Pricing Groups
If you have more pricing groups and you offer the item at different prices click on customize pricing groups. Add the prices that will be applied to the different segments.
Select Taxes and Discounts
If there are taxes that need to be applied to the session you can select it from the drop-down menu.
Hint: You can select more than one type of tax.
7.4 Billing: Manage Items
What is an item?
As a nursery or child care center you don't just provide care for the children. Most likely, you also offer meals, supplies, or other add-ons to your service.
Create Item
To create an item first navigate to the Items tab, then do the following:
Click on the + New Item button and add the required fields:
-
Item Name: The name of the item you are creating. For example, if you are offering milk to the children you would name the item Milk.
-
Pricing: This is where you choose how you are going to charge for the item. Are you going to charge the child every time they consume or use the item or will it be added as a monthly charge?
Note: if you select the monthly pricing option it will mean that you will charge on a monthly basis for offering this item on a specific day of the week. For example, if it is added to the child's plan on Monday the monthly price will apply for all Mondays in the given month.
Select Pricing Groups
If you have more pricing groups and you offer the item at different prices click on customize pricing groups. Add the prices that will be applied to the different segments.
Select Taxes and Discounts
If there are taxes or discounts that need to be applied to the item you can select them from the drop-down menu.
Select Session Availability
The final step is to add when the item is available. For example, you can have an item (add-on) that is only available on Monday. If the item is set up to be only available for one day, it can't be added to any of the children's plans on any other days of the week.
Edit Item
To edit an item that you have already created click on the three horizontal dots above the item information, then choose Edit.
Note: Once an item has been assigned to a plan only the price can be edited.
7.5 Create Invoicing Rules
What is an invoicing rule?
An invoicing rule is a rule used by the system to generate an invoice. This rule lets the system know when the invoice should automatically be generated and when it is due.
Create an Invoicing Rule
To create an invoicing rule, follow these steps:
-
-
Click on the Show button below the Billing Settings icon
-
Click on the +New Rule button
-
Add the required information
-
Protip: If you would like this rule to be your default rule click the checkmark next to Set as default. Making it the default rule will assign the invoicing rule to all future children.
Assign Invoicing Rule
If you set an invoicing rule as default it will be assigned to all newly added children. However, in order for the invoicing rule to apply to already existing children you need toa assign them the invoicing rule.
To assign an invoicing rule, follow these steps:
-
Navigate to the child's profile
-
Click on the Invoices tab
-
Click on the Edit button next to Invoice rule
-
Choose the invoicing rule you want to apply
-
7.6 Manage Plans
To start creating invoices for students, you first have to create the plan, add charges and any Ad-Hoc products.
7.7 Billing: Manage Packages
What is a package?
You offer your service to care for children that come in at different times and stay in your care for different periods of time. You will most likely charge each of these children differently depending on the time they are in your care. This is where packages come in, a package consists of the sessions (time slots) you created earlier, items (if you offer any), and taxes/discounts.
Packages can be charged by the week, month or a full program (term or year). Let's take a look at an example to help explain it.
In the above fee structure we have many packages, but we will focus on the highlighted ones. The ones highlighted in red are one package with different pricing groups because they offer the same service for the same amount of time but at different prices based on age. The ones highlighted in green are another package because it has been offered for 3 days of the week compared to the 5 of the red package.
Create Package
To create a package, follow these steps:
Click on the +New Package button and add the required fields:
-
Package Name: The name of the package you are creating. Make the name as clear as possible, for example, if it is a weekly package puts the word weekly in the name. The highlighted 5 day package, for example, can be called "5 Days Term (8:00 - 13:00)".
-
Pricing: This is where you choose how you will charge for this package. Is this a weekly? Monthly? Or a charge for a full program?
Select Pricing Groups
In the example above, we have two pricing groups, BABIE and TODDLERS. We would then choose a general price and then add the prices for the babies and toddler group.
Select Taxes and Discounts
If there are taxes that need to be applied to the session you can select it from the drop-down menu.
Hint: You can select more than one type of tax.
Add Sessions
Add the sessions that you created that fit this package. We will go back to our current example, which would be the session from 8:00 - 13:00. When adding the session to the package you have a few options:
Flexible time:
If you are offering the service with flexible times you can select the toggle switch and add the default times.
Availability:
Select the days and times you are offering this service within your package.
Add Items
Add any items that are offered within the package, and included within the package price.
Save and you're all done!
7.8 Getting Started with Billing
Do you charge by the hour? by the week? for a whole term? Parent makes it simple to set up any fee structure. We will go through how to set up all of your fee structures and how Parent can be tailored for your specific pricing plans.
Here at Parent, we have created a billing platform that can be tailored to all plans. To get started with our billing platform, start with these three steps:
-
Manage Products - Before you can set up plans and start charging students, you will first need to set up all the fees and charges. The products are any service you offer to your students.
-
Manage Student Plans - Create plans for the children in your institute so you can start sending out invoices.
-
7.9 Add Charges to Plans
Besides charging children for their attendance you most likely have other charges that need to be added. You could have a registration fee that is only charged once the child enters your care or a bus charge that is paid monthly.
Let's go through how to add these charges to the child's plan so they can be invoiced.
One Time Charges
Add Charge
To add a charge that will only be invoiced once such as the registration fees or medical fees, follow these steps:
-
Navigate to the child's profile
-
-
-
-
Select the date that the charge needs to be applied
-
Choose if you want to apply a pricing group or discount to the charge
-
Choose the charge and the amount of times it should be added
-
Remove Charge
If you need to remove a charge that has already been added and has not been invoiced, follow these steps:
-
-
-
Select the date you had selected for the charge
-
Select the charge or add 0 to the number field
-
Recurring Charge
To add a charge that will be billed weekly or monthly, follow these steps:
Add Charge
-
Navigate to the child's profile
-
Find the plan you want to add the charge to
-
Click the three dots on the upper right corner of the plan
-
-
Click the Add Charge button
-
Select the charge/charges
-
Remove Charge
-
Navigate to the child's profile,
-
Find the plan you want to add the charge to,
-
Click the three dots on the upper right corner of the plan,
-
-
Click the Edit Charge button,
-
Select the charge or add 0 to the number field,
-
7.10 Billing: Manage Taxes and Discounts
How do I add taxes and discounts?
No matter where your childcare center is in the world, there are always taxes to be applied and discounts that you offer.
Create Tax
To create a tax, follow these steps:
-
Click the Tax Types button
-
-
Type the name of the tax and the percentage
-
Click Save when you are done adding all taxes that can be applied
Delete Tax
To delete a tax, follow these steps:
-
Click the Tax Types button
-
Click the delete icon next to the tax you want to delete
Note: Once a tax has been added to any product or plan it can no longer be deleted.
Create Discount
To create a discount, follow these steps:
-
Click the Discount Types button
-
-
Add the discount name and percentage
-
Delete Discount
To delete a discount, follow these steps:
-
Click the Discount Types button
-
Click the delete icon next to the discount you want to delete
Note: Once a discount has been added to any product or plan it can no longer be deleted.
7.11 Generate Manual Invoices
From time to time you may need to generate an invoice without creating a plan. For example, in case there is a new child at the center but they haven't decided on the plan they will enroll in.
To create a manual invoice, follow these steps:
-
Navigate to the child's profile
-
Click on the Invoices tab
-
Click the + Add New button and select Manual Invoice
A popup will appear and you can add the invoice details
-
-
Select the invoice date and the due date of the invoice
-
Select the invoice period (Optional)
-
Click Add item then add the description and amount of what you are invoicing. Select any taxes that need to be applied.
-
When you are done click the Save button.
7.12 Edit or Schedule a Change in the Plan
Now that you have created plans for children, you may need to go back and edit certain parts of the plan or create a schedule change. Here we will go through the difference between editing and scheduling a change as well as how you can do both.
Edit
You can edit any plan as long as you have not generated an invoice for that plan. Use the edit option if you want to, for example, add discounts or change the package that will be invoiced.
Schedule Change
A schedule change is used when you need to have another plan added after a specific date. For example, if the child is only on the plan for the first term and will be on a different package the second term.
In this case, schedule change and choose the start date to be the next term and add the new products the child will be charged for.
You can also use a schedule change if the plan for the child changes at any point, in this case the current plan will end on the new plan's start date.
Edit Plan
To edit an existing plan, follow these steps:
-
Navigate to the child's profile
-
-
Find the plan you want to edit
-
Click the three dots on the upper right corner
-
Once you have made the edits you need to the plan, click Save.
Schedule Change
If you need to schedule a change for a plan, follow these steps:
-
Navigate to the child's profile,
-
-
Click the Schedule Change button or find the plan you want to schedule a change for and click the three dots then choose Schedule Change,
-
Choose the start and end date of the new plan and edit the products,
-
7.13 Ad-Hoc Products
What is Ad-Hoc Pricing?
Ad-Hoc pricing is used to override the price of a particular product.
Let's look at this example:
Child A attends Monday, Wednesday and Thursday every week, so their plan is set up to invoice them for those three days. Let's say Child A comes in on Tuesday one week, you may want to charge them a higher price because this will fall outside their package. This is where Add-Hoc pricing comes in.
Add Ad-Hoc Session/Item
To add an Add-Hoc session or item to be invoiced, follow these steps:
-
Navigate to the child's profile
-
-
-
-
Select the date that you want to apply the ad-hoc product
-
Choose if you want to apply a pricing group or discount
-
Choose the Sessions or Items tab depending on which one you want to add
-
Select the product on which you want to apply your Ad-hoc pricing
-
Remove Ad-Hoc Session/Item
To remove an Ad-hoc session or item before it has been invoiced, follow these steps:
Navigate to the child's profile
-
-
-
-
Select the date of the Ad-hoc product,
-
Click on the product to remove it,
-
7.14 Billing: Manage Products
Feature available on the Web App.
Before you can start setting up the plans for children you first need to add all your fees, charges, taxes, and discounts. All your billing related setup can be found in the Products Management page. To get to the Products Management page, follow these steps:
-
-
Click on the Show button below the Products Management icon
From the Product Management page you can start adding your fee structure by adding all the services and products that you charge students for.
-
Manage Pricing Groups - If you offer the same package with the same time slots, but using different prices based on age or for different segments then you need to set up your pricing groups.
-
Manage Taxes and Discounts - Add all the taxes and discounts that can be applied to your products.
-
Manage Sessions - In order to start creating packages or adding plans, you have to first create your sessions. The session is the time slot/s you offer your service.
-
Manage Items- Items are any add-ons that you charge the child for. This can be their meals and any supplies that you provide on a regular basis.
-
Manage Packages - Set up the packages you offer which include sessions and items as a bundle for children in your institute.
-
Manage Charges- Add any extra charges such as registration fees.
7.15 Manage Invoices and Payments
Now that you have set up your products and created the plans, you are ready to start sending out invoices. Let's go ahead and start setting up the steps to send out invoices.
-
Manage Payers: Learn how to add payers (who will be paying the invoices) for the children.
-
Invoicing Rules: Learn how you can set up invoicing rules so invoices can be generated and sent automatically.
-
Deposits: If you accept deposits learn how you can keep track of what has been collected.
-
Manage Invoices: Learn how to create invoices or have them automatically generated.
-
Manage Payments: Learn how to add new payments that you receive and keep an accurate account balance.
-
Credit Notes: Learn how to create credit notes if a full or partial payment needs to be returned.
7.16 Billing: Manage Sessions
What is a session?
A session is a time slot in which you offer your service. For example, let's say you offer different prices for children that come in from 8:00 to 13:00 than the children that will come in from 8:00 to 15:00. In that case, you will have the following sessions:
-
Morning session (8:00 - 13:00)
-
Full-day session (8:00 - 15:00)
Create a Session
To create a session, follow these simple steps:
Click on the +New Session button and add the required fields:
-
Session Name: The name of the session you are creating. If this session is for example a morning session from 8:00 to 11:00 you can name it with the time of day and the hours it's offered.
-
Pricing: This is where you choose how you are going to charge for the session (time slot). Will the price you put be applied for each hour? for the full time slot? or for the whole month?
Select Pricing Groups
Say you have a baby group and a toddler group and both will attend the same hours but pay different prices. First add the general price which will be applied if the child doesn't belong to one of the pricing groups.
If you have more pricing groups and you offer the session at different prices click on customize pricing groups. Add the prices that will be applied to the different segments.
Select Taxes and Discounts
If there are taxes that need to be applied to the session you can select it from the drop-down menu.
Hint: You can select more than one type of tax.
If there are discounts that can be applied to the session, add them using the discounts drop-down menu.
Pro-tip: Discounts will only be applied to the children that you choose. Setting up the discounts in the session just gives you the option of applying it to specific children.
Select Session Availability
The final step of setting up the session is to select when it is available (when the session can be offered). For example, you can have a session (time slot) that is only available on Monday, Wednesday and Friday. If the session is set up with only those three days it can't be added to any of the children's plans on any other days of the week.
Set the time the session is offered by selecting the start and end times.
If you have a session that can be offered at different times it would fall under a flexible booking time. Let's say you have a three-hour session, but one child can attend from 8:00 to 11:00 and another child can attend from 9:00 to 11:00. In that case, select the Flexible booking time toggle to on.
Then set the default start and end time of the session.
7.17 Manage Payments
Once you receive a payment you need to add it to the system so you can have a correct account balance.
Add Payment
To add a payment, follow these steps:
-
Navigate to the child's profile
-
Click on the Invoices tab
-
Click the +Add New button
-
-
The contact who made the payment
-
-
The payment method: Cash, Credit Card, or Check
-
If the payment is made for a specific invoice, select the invoice
-
-
Any notes you would like to include regarding the payment
Note: Once payment has been added, it can't be deleted.
Remove Payment from Invoice
We understand that sometime our users could enter the incorrect number for a payment, it easy to modify , just follow these simple steps:
-
Navigate to the PYMT-####,
-
Click on the transaction reference,
-
You will see the new payment invoice and below you should find a delete button,
-
-
Repost the correct payment amount.
Note: Once you cancel a payment and add a new one it will replace the old one to avoid causing any confusion for the parents.
7.18 Invoice Settings
Personalized invoices help reinforce your brand image and identity. Branding helps you build confidence, builds an emotional connection, and tells your story in an instant.
To customize your invoice, please follow these steps:
-
-
Click the Show button below the Billing Settings
-
Choose the settings you want to change and personalize
-
When you are done, click Save
Note: To allow invoices, credit notes, and payments to be deleted, select the Delete billing transactions
7.19 Manage Invoices
Here you will learn how to generate an invoice that is based on the child's plan. To generate a manual invoice that doesn't require a plan, please find the steps here.
Create Invoice
If you don't have an invoicing rule set up or you want to manually generate an invoice, follow these steps:
-
Navigate to the child's profile
-
Click on the Invoices tab
-
Click the +Add New button
-
Select the following required fields:
-
The person who is being invoiced
-
The invoice period: is it a month or a custom period
-
-
The due date of the invoice
You can add notes to the invoice.
The system will automatically calculate the invoice amount based on the child's plan.
Cancel Invoice
Canceling an invoice will generate a credit note with the invoiced amount. To cancel an invoice, follow these steps:
-
Click on the invoice number
-
The system will show you a confirmation message that canceling the invoice will generate a credit note. Click Yes to proceed.
7.20 Manage Payers
Before you can start sending invoices the system needs to know who will be paying. Payers are assigned from the child's existing contacts.
Add Payer
To add a payer/s for a specific child, follow these steps:
-
Navigate to the child's profile
-
Click on the Invoices tab
-
Click the Assign Payer button
-
Select the contact/contacts that will be paying the invoices
-
If you chose more than one contact, choose the percentage each of them will be paying from the invoice
-
Remove Payer
If one of the contacts will no longer be paying the invoices, follow these steps to remove them as a payer:
-
Navigate to the child's profile
-
Click on the Invoices tab
-
Click the Edit button next to the Payers tab
-
Click the X next to the payer's name
-
7.21 Manage Deposits
You might charge a deposit when a child first joins your institute. In this article, we will go through how to add a deposit and invoice it.
Add Deposit
To add a deposit that will be invoiced, follow these steps:
-
Navigate to the child's profile
-
Click on the Invoices tab
-
Click the New Deposit button
-
Add the deposit information
-
Note: if the deposit has already been paid and doesn't need to be invoiced, select the Already paid check-mark.
Invoice a Deposit
Delete Deposit
If the deposit has not been paid or invoiced, you can delete it. To delete a deposit, follow these steps:
-
Navigate to the child's profile
-
Click on the Invoices tab
-
Return Deposit
If the deposit has already been paid, you can return it. Returning a deposit will create a credit note and credit the child's account with the value of the deposit.
To return a deposit, simply click on Return and confirm that you want to complete the action.
7.22 Create a Plan
In order to invoice any child at your institute, you first need to add a plan. The plan is the service you are offering this child. For example, you can have a child who will be attending a full term and another child who attends three days a week on a weekly basis. This is where the plan comes in so you can differentiate how each child's family will be billed.
Add Plan
To add a plan for any child, follow these steps:
-
Navigate to the child's profile
-
-
If you haven't created a plan yet, click Create New Plan. If the child already has a plan you add a Schedule Change.
-
Choose the start date of the plan. By default the start date is the child's registration date.
-
Select the calculation method. If you will be charging the child on a monthly basis choose Monthly. If the child will be billed for a full term or a package then choose Actual.
-
Select the package or add the sessions that the child will be attending by clicking the Add button on each of the days you want to add the session to.
-
If there is a discount that you need to apply select it from the Discounts drop-down menu.
-
Tips for Using Parent™ Childcare App Effectively
To get the most out of Parent™ Childcare App, here are some tips for using it effectively:
Keep Attendance Records Accurate and Up-to-Date
Make sure to mark attendance for each child every day and update records as needed. Accurate attendance records help you comply with government regulations and ensure the safety and well-being of the children in your care.
Make Use of Daily Sheets for Better Parent Communication
Use the daily sheets feature to keep parents informed about their child's activities and progress. Customize daily sheets to match your center's curriculum and activities, and include photos and videos to make them more engaging.
Utilize the Parent Communication Feature to Build Strong Relationships with Parents
Use the parent communication feature to communicate with parents in real-time. Respond promptly to messages, send updates about their child's progress, and share photos and videos of their child's activities.
Regularly Check Billing and Invoicing Records for Accuracy
Make sure to check billing and invoicing records for accuracy regularly. Review invoices and payments, and generate financial reports to track your center's finances.
Troubleshooting common issues
While the Parent™ Childcare App is generally user-friendly, you may encounter some common issues that require troubleshooting. Although we offer regular software updates to stay relevant and up-to-date in order for you to enjoy improved performance and access to innovative features, if you are experiencing difficulty using the app, there are several steps you can take to resolve the issue. First, make sure you have the latest version of the app installed on your device. You can also try logging out and logging back into your account, or uninstalling and reinstalling the app. If you are still experiencing issues, you can check out our help center or contact Parent™ App support team for assistance.
Conclusion
Looking for a hassle-free way to manage your childcare center? Look no further than Parent™️! It is the best childcare app for your daycare center. This all-in-one, cloud-based software simplifies your daily operations, including attendance tracking, billing and invoicing, and communication with parents. Plus, with features like daily reports and curriculum planning, you'll have everything you need to run your center smoothly.
But that's not all. With Parent, you'll enjoy streamlined communication with parents, simplified administration tasks, and improved parent engagement. Plus, our platform provides greater transparency, so parents can see exactly what their child is doing throughout the day.
And with our planning and reporting features, you can easily manage schedules and track progress to make data-driven decisions. So why wait? Try Parent Childcare App today and see the difference it can make for your center!
FAQs
- How much does Parent™ Childcare App cost? The cost of Parent™ Childcare App depends on the number of children and parents in your center. You can visit the pricing page for more information.
- Is Parent™ Childcare App easy to use? Yes, Parent™ Childcare App is designed to be user-friendly and easy to use. You can get started quickly and easily with the step-by-step setup process.
- Can parents access their child's daily sheets and attendance records? Yes, parents can access their child's daily sheets and attendance records using the Parent™ Childcare App parent portal.
- Is Parent™ Childcare App secure? Yes, Parent™ Childcare App uses industry-standard encryption and security protocols to ensure the safety and security of your center's data.
- Does Parent™ Childcare App offer customer support? Yes, Parent™ Childcare App offers customer support via phone and email. You can also access a range of resources and tutorials on the Parent™ Childcare App website to help you use the app effectively.

 Billing, Invoicing Automation & Smart Finances
 Communication & Engagement
 Child Development & Progress
 Waitlist, Forms & Attendance
 Effortless Team Management
 Daily Updates That Matter
 Blogs
Blogs
 Case Studies & Testimonials
 FAQs
FAQs
 Webinars
 Help Center